")
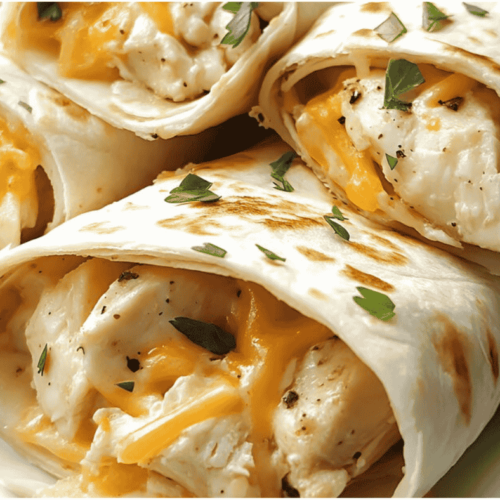
Garlic Cheesy Chicken Wraps
Hey, I have to tell you about something I’ve been making lately that you have to try out too—Garlic Cheesy Chicken Wraps.
Seriously, these wraps are a total game-changer. They’re full of flavor, super easy to put together, and perfect for when you want something comforting but don’t feel like cooking forever.
I know how busy things can get sometimes (trust me, I’ve had those days where even boiling water feels like too much). That’s exactly why I started making these.
All it takes is a few simple ingredients, and boom—you’ve got something that tastes like it came from your favorite café shop.
And the best part it? You can customize them however you want it. I like mine with a little kick, so I’ll toss in some chili flakes.
But you? Maybe you’re more of a mild garlic-and-cheese kind of girl—and that works well too!
You and I both know that recipes need to be easy and tasty. This one checks both boxes.
Let’s make something that’ll make your whole family happy and leave you feeling like a kitchen rockstar—even if you’re just throwing it together between errands.
Ready? Let’s put our hands on it.
How to Make Garlic Cheesy Chicken Wraps (Step-by-Step)
Alright, let’s do this! I’m walking you through it like we’re in the kitchen together. No fancy stuff—just simple steps and good food here.
Step 1: Cook the chicken
Grab 2 chicken breasts, season with salt, pepper, garlic powder, and a pinch of paprika.
Cook them in a skillet over medium heat with a little oil—about 6–7 minutes per side until golden and cooked through.
Let them cool a bit, then slice or shred.
Step 2: Get cheesy
In a bowl, mix your chicken with 1 cup of shredded mozzarella and ½ cup of shredded cheddar.
Add 2 cloves of minced garlic (or more if you’re a garlic lover—I won’t judge).
Toss it all together. Smells amazing already, right?
Step 3: Warm up the wraps
Take your tortillas (large ones are best) and warm them for 10 seconds in the microwave so they’re easier to fold.
Cold tortillas = broken dreams.
Step 4: Wrap it up
Spoon the cheesy chicken mix into each tortilla. Fold it like a burrito—sides in, then roll it up tight.
Step 5: Toast ‘em!
Place your wraps seam-side down on a hot skillet. Toast each side for 2–3 minutes until golden and crispy.
No oil needed, but a little butter doesn’t hurt.
Step 6: Eat and enjoy
Slice ‘em in half and dig in. Maybe dip them in ranch, sour cream, or even salsa. Up to you!
See? Easy. And now your kitchen smells amazing.
Common Mistakes to Avoid (So You Don’t Ruin a Good Thing)
Let’s keep it real—this recipe is easy, but there are a few ways it can go sideways. Here’s what to watch out for:
Skipping the seasoning
Plain chicken? Girl, no. If you forget the spices, your wrap will taste like sadness. Season it well—your family deserves better.
Using cold tortillas
Trying to fold a cold tortilla is like wrestling a dry sock. Warm them up first so they’re soft and roll like a dream.
Overstuffing the wrap
I get it—you’re excited. But if you stuff it like a suitcase before vacation, it’s gonna burst open in the pan. Less is more, trust me.
Not toasting the wrap
Toasting gives you that golden, crispy finish. Skipping this step? You’re missing half the magic. Don’t do it.
Using raw garlic without mixing it in
Biting into a hunk of raw garlic = instant regret. Mix it in well with the cheese and chicken so it blends, not bites.
Avoid these little traps, and your Garlic Cheesy Chicken Wraps will turn out chef’s kiss every single time you make them.
How to Best Serve Garlic Cheesy Chicken Wraps
These wraps are best served hot and fresh—crispy on the outside, melty on the inside.
I like to slice them in half on a diagonal (makes them look fancy with zero effort) and plate them with a little dipping sauce on the side.
Think ranch, garlic aioli, sour cream, or even spicy mayo if you like a little heat.
Add a simple side—chips, a small salad, or even some roasted veggies—and boom, you’ve got a full meal that looks like you actually planned it.
Perfect for lunch, dinner, or impressing someone without breaking a sweat.
Recipe Best Tips
Here are a few little tricks to take your Garlic Cheesy Chicken Wraps from good to wow. I need another one:
Use rotisserie chicken when you’re short on time
It’s already cooked, juicy, and full of flavor. Just shred and go—no one will know you didn’t make it from scratch.
Don’t skip the garlic
Fresh garlic gives the wrap that bold, mouthwatering flavor. Mince it fine so it melts right into the mix.
Add a splash of cream cheese or sour cream
If you want an extra creamy filling, stir in a spoonful before wrapping. Trust me, it’s next level.
Toast low and slow
Don’t rush the toasting step. Medium heat gives you that golden crunch without burning the wrap or leaving the cheese cold.
Make ahead and reheat
Wrap them up, store in the fridge, and reheat in a skillet or toaster oven for a quick lunch. They stay crispy and delicious!
Keep these tips in your back pocket, and you’ll be wrapping like a pro every single time.
Serving Suggestions for Garlic Cheesy Chicken Wraps
These wraps are pretty amazing on their own, but here are a few ways to level up your meal:
Pair with a fresh salad
A crisp, light salad with some vinaigrette is the perfect balance to the cheesy, garlicky goodness. Try a simple mix of greens, cucumber, and a tangy lemon dressing.
Serve with a side of fries or chips
Who doesn’t love a crunchy side? Crispy fries or tortilla chips make for the perfect snackable pairing with these wraps.
Add a veggie side
Roasted or grilled veggies like bell peppers, zucchini, or even corn on the cob add color and a healthy touch to the meal.
A cool dip goes a long way
Ranch, guacamole, or salsa are always a win when served alongside. You can even get fancy with some garlic aioli or spicy mayo if you’re feeling extra.
Serve with a cold drink
An ice-cold soda, lemonade, or even a chilled glass of white wine (if you’re treating yourself) pairs perfectly with these wraps.
There you go! Whether you’re keeping it casual or turning it into a feast, these wraps are ready for anything.
Storage and Freezing Garlic Cheesy Chicken Wraps
Got leftovers? Here’s how to keep them fresh for the next time you need a quick meal:
Storing in the Fridge:
If you have any wraps left over, wrap them tightly in plastic wrap or store them in an airtight container.
They’ll stay fresh in the fridge for up to 2–3 days. When you’re ready to eat, just reheat them in a skillet on medium heat for a few minutes on each side until crispy again. No soggy wraps allowed!
Freezing for Later:
Want to make a big batch and save some for later? Go for it! To freeze, let the wraps cool completely, then wrap each one tightly in plastic wrap and aluminum foil.
Store them in a freezer-safe bag or container. They’ll last up to 3 months in the freezer. To reheat, bake them at 375°F for 15-20 minutes or until hot and crispy. You’ll be eating like it’s the first time!
Enjoy your leftovers just as much as the first round, whether you’re diving in the next day or a few weeks later!
Frequently Asked Questions (FAQs)
Here are the answers to some common questions you might have about these Garlic Cheesy Chicken Wraps:
Can I use a different type of cheese?
Absolutely! While mozzarella and cheddar are my go-to, you can use whatever cheese you prefer—Monterey Jack, provolone, or even a spicy pepper jack if you want some heat. Mix it up and make it your own!
Can I make this recipe vegetarian?
Yes! Swap the chicken for something like sautéed mushrooms, black beans, or even crispy tofu. You’ll still get that cheesy, garlicky goodness without the meat.
How can I make this spicier?
Add some chopped jalapeños to the chicken mixture, sprinkle chili flakes on top, or use a spicy cheese like pepper jack. Get as fiery as you want!
Can I make these wraps ahead of time?
Yes! You can prep them in advance and store them in the fridge for a day or two. Just reheat in a skillet or oven to get them crispy again.
Can I use a store-bought rotisserie chicken?
Yes, that’s actually a great shortcut! Just shred the chicken and skip the cooking part. It’ll save you time and still taste amazing.
What kind of tortillas should I use?
Flour tortillas work best for this recipe because they’re soft and pliable, but if you want something healthier, whole wheat or even low-carb tortillas will work too.
How do I keep these wraps from getting soggy?
Make sure to toast the wraps until they’re nice and golden on both sides. If you’re storing them, wrap them up tightly, but let them cool before refrigerating or freezing.
Got more questions? Drop them in the comments, and I’ll be happy to help you!
Conclusion:
Alright, now that you’ve mastered these Garlic Cheesy Chicken Wraps, I’m pretty sure you’ll never look at store-bought wraps the same way again.
These are too good (and way too easy) to pass up! I’d love to see how you make them your own, so feel free to share your version—I’m all about those creative twists!
And hey, if you ever find yourself in a wrap crisis, just remember this recipe has your back.
Now go ahead, impress your family, and enjoy the cheesy, garlicky goodness. You’ve made it!
You Might Also Want To Try These Delicious Ones…
- Sticky Beef Noodles
- Mongolian Ground Beef Noodles
- Black Pepper Beef
- Chicken And Rice Alfredo
- Garlic Shrimp With Broccoli
——–
⤵⬇
Garlic Cheesy Chicken Wraps
Ingredients
Ingredients
- 2 cups cooked shredded chicken
- 1 ½ cups shredded mozzarella cheese
- ½ cup shredded cheddar cheese
- 2 cloves garlic minced
- 1 tbsp olive oil
- 4 large flour tortillas
- 1 tsp paprika
- 1 tsp garlic powder
- Salt and pepper to taste
- 1 tbsp butter for toasting
Instructions
Step-by-Step Cooking Instructions
- In a bowl, mix the chicken, mozzarella, cheddar, garlic, paprika, garlic powder, salt, and pepper.
- Heat olive oil in a skillet over medium heat.
- Place one tortilla in the skillet, add the chicken-cheese mixture, and fold the tortilla.
- Cook the wrap for 2-3 minutes on each side until golden and crispy.
- Repeat with the remaining tortillas and filling.
- Serve hot with a side of dipping sauce.
Notes
- Feel free to swap the chicken for mushrooms or tofu for a vegetarian version.
- For extra flavor, add some chopped jalapeños or hot sauce.
- Store leftovers in an airtight container in the fridge for up to 3 days. Reheat in a skillet for best results.
")
")
")