")
Honey Garlic Chicken Sauce
Hey, friend! Let’s talk about one of my all-time favorite recipes: Honey Garlic Chicken Sauce.
If you’re anything like me, you love easy meals that taste like you spent hours in the kitchen.
This sauce is a total game-changer, and trust me, you’re going to want it in your back pocket.
It’s sweet, savory, and just the right amount of garlicky goodness. Seriously, the first time I made it, I couldn’t believe how quickly it came together — and how much my family loved it.
I’m all about simple recipes that don’t need a ton of ingredients. You probably already have most of the stuff in your kitchen right now!
And the best side of it? This sauce is so versatile. You can drizzle it over chicken (obviously), but it also works wonders with veggies or even rice. You know those nights when you’re just not in the mood for anything complicated? This is your answer. It’s quick and tasty.
I’m excited to share this with you because I know you’ll love it. So, grab your apron, and let’s get cooking! Trust me, once you try it out, you’ll be making this sauce all the time. 🍯
Ingredients
- 2 chicken breasts (or thighs, if you prefer)
- 1/4 cup honey
- 3 cloves garlic, minced
- 1 tablespoon soy sauce (or tamari for a gluten-free option)
- 1 tablespoon apple cider vinegar (or lemon juice as a substitute)
- 1 tablespoon olive oil (for cooking)
- 1 teaspoon ginger (optional, for an extra kick)
- Salt and pepper, to taste
Key Substitutions:
- You can swap chicken for tofu or shrimp if you’re looking for a different protein.
- Honey can be replaced with maple syrup for a lighter, vegan option.
- If you don’t have apple cider vinegar, feel free to use regular vinegar or even lime juice for that tangy twist!
These ingredients are simple but pack a lot of flavor, and you can easily swap a few things based on what you have at home!
How to Cook It: Step-by-Step Directions
- Get that chicken ready: If you’re using chicken breasts, slice them in half so they cook faster. Season them with a little salt and pepper. You can pretend you’re a top chef while doing this—just don’t forget to keep it simple!
- Heat up that pan: Grab a skillet and heat up the olive oil over medium heat. You want it hot, but not like the surface of the sun.
- Cook the chicken: Toss the chicken into the skillet. Let it cook for about 5-7 minutes on each side until it’s golden and cooked through. Don’t rush this part, let it get crispy! When it’s done, take it out and set it aside.
- Time for the sauce: In the same skillet, toss in the minced garlic. Stir it around for about 30 seconds—just until it smells amazing (you’ll know it when you smell it).
- Mix it up: Now, add the honey, soy sauce, and apple cider vinegar to the skillet. Give it a good stir to mix everything together. Let it simmer for 2-3 minutes so the sauce thickens a bit.
- Put the chicken back: Place the cooked chicken back in the pan, and spoon that delicious sauce over it. Let it soak in for another 2-3 minutes. You can even flip the chicken to make sure it gets coated all over.
- Serve it up: Plate the chicken and pour the sauce over the top. You’re done! Look at you—cooking like a pro.
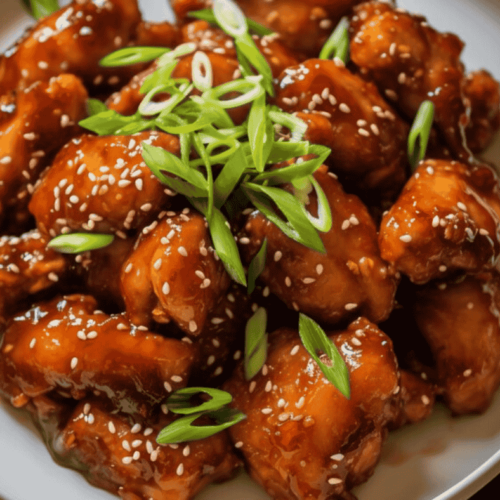
Optional: Sprinkle with a little sesame seed or chopped green onions if you want to go all out.
Enjoy! I know you’re going to love this!
Common Mistakes to Avoid
Burning the garlic
- Garlic cooks quickly, so if you let it sit in the pan too long, it’ll burn and turn bitter. Keep an eye on it and stir constantly. Trust me, your kitchen will smell way better!
Overcooking the chicken
- If your chicken is dry and tough, you probably overcooked it. Aim for a golden, crispy outside and a juicy inside. Use a meat thermometer if you’re unsure — 165°F is your magic number!
Not letting the sauce simmer
- If you skip the simmering step, your sauce won’t thicken and absorb all that amazing flavor. Give it those 2-3 minutes of simmer time to get that rich, sticky goodness.
Skipping the seasoning
- Chicken without seasoning? No thanks! Don’t forget to season your chicken before cooking. A little salt and pepper go a long way. You’ll be glad you did.
Not tasting the sauce
- Don’t skip the “taste test” on the sauce. If you like it a bit sweeter, add a little more honey. Want more tang? A splash of vinegar will do. Adjust it to your taste!
Forgetting to let the chicken soak in the sauce
- Don’t just throw the chicken back in the pan and rush off. Let it soak in the sauce for a couple of minutes so the flavors really get in there.
With these tips in mind, you’ll be making perfect Honey Garlic Chicken every time!
Variations & Customizations
Spicy Honey Garlic Chicken
Want to spice things up? Add some red pepper flakes or a splash of hot sauce to the sauce. You can also toss in a finely chopped jalapeño while sautéing the garlic for that extra kick. Heat lovers, this one’s for you!
Keto-Friendly Version
Keep it low-carb by swapping the honey with a sugar-free sweetener like monk fruit or stevia. You can also use coconut aminos instead of soy sauce to reduce the carbs even more. Now you’ve got a tasty, keto-approved dish!
Vegetarian Swap (Honey Garlic Tofu)
Not into chicken? No problem! Swap the chicken for firm tofu. Just press the tofu to remove excess moisture, then cut it into cubes and pan-fry it until golden and crispy. The honey garlic sauce will make it absolutely irresistible!
These tweaks let you easily mix things up depending on your mood or dietary preferences. Have fun experimenting!
Serving and Presentation Tips
- Plate the Chicken Neatly: Once your chicken is coated in that mouthwatering sauce, grab a clean, wide plate. Lay the chicken down in the center, making sure the sauce covers it beautifully.
- Drizzle Extra Sauce: Don’t hold back on the sauce! Spoon any remaining sauce from the pan over the chicken. It’s the magic touch that makes the dish irresistible.
- Garnish with Style: A little garnish can go a long way! Sprinkle some sesame seeds or freshly chopped green onions on top. It’ll add a pop of color and texture, plus a hint of extra flavor.
- Pair with a Side: Serve it with steamed rice, roasted veggies, or a fresh salad to complete the meal. Rice soaks up the extra sauce and balances out the sweetness—plus, it looks gorgeous next to the chicken.
- Serve Immediately: This dish is best served hot and fresh, so don’t wait too long to bring it to the table. Your guests (or you!) will appreciate the warmth and flavor.
How to Best Serve This Dish
Serve this Honey Garlic Chicken hot, with the sauce generously drizzled over the top for that perfect balance of sweet and savory.
Pair it with steamed rice, roasted vegetables, or a fresh salad to complete the meal.
A little garnish with sesame seeds or chopped green onions adds a nice touch, making it look as delicious as it tastes.
Perfect for a weeknight dinner or impressing guests at your next gathering!
Recipe Best Tips
Use Fresh Garlic
Fresh garlic makes a huge difference in flavor. Avoid using garlic powder—fresh garlic gives the sauce a more aromatic, bold taste.
Don’t Overcrowd the Pan
If you’re making a double batch, cook the chicken in batches. Overcrowding the pan can make the chicken steam instead of sear, and we want that crispy, golden outside.
Let the Chicken Rest
After cooking, let the chicken rest for a few minutes. This helps lock in the juices and ensures your chicken stays tender and juicy.
Thicken the Sauce
If the sauce is too thin, simmer it for a few more minutes to thicken it up. It should coat the chicken and vegetables beautifully.
Taste the Sauce
Always taste the sauce before you finish cooking. Want more sweetness? Add a bit more honey. Prefer it tangier? A little extra vinegar will do the trick!
These simple tips will make your Honey Garlic Chicken even more delicious, so don’t skip them!
Storage and Freezing
Storing Leftovers
If you have any leftover Honey Garlic Chicken, store it in an airtight container in the fridge. It will stay fresh for about 3-4 days. Make sure the chicken is fully cooled before storing it to prevent condensation inside the container.
Freezing Leftovers
Want to freeze some? First, let the chicken cool completely. Then, place it in a freezer-safe container or a zip-top bag. Label it with the date and freeze for up to 3 months. When you’re ready to enjoy it, just thaw it in the fridge overnight and reheat in the microwave or on the stove.
Reheating Tips
To reheat, heat the chicken in a pan over low heat with a splash of water or chicken broth to prevent it from drying out. Stir in a bit of the leftover sauce for extra flavor.
Frequently Asked Questions (FAQs)
Can I use boneless, skinless chicken breasts?
Absolutely! Boneless, skinless chicken breasts work perfectly for this recipe. Just be sure to adjust the cooking time since they cook a bit faster than thighs.
Can I make this recipe ahead of time?
Yes! You can cook the chicken and make the sauce in advance, then store them separately in the fridge. When you’re ready to serve, simply reheat and combine.
Can I use a different sweetener instead of honey?
If you want to swap out the honey, you can use maple syrup or agave syrup. Keep in mind, the flavor will change slightly, but it’ll still be sweet and delicious!
Can I make this recipe spicy?
Of course! Add red pepper flakes or a splash of hot sauce to the honey garlic sauce to give it a kick. You can also toss in some chopped jalapeños when cooking the garlic for extra heat.
What can I serve with this chicken?
This Honey Garlic Chicken pairs wonderfully with steamed rice, roasted veggies, mashed potatoes, or a fresh green salad. You can’t go wrong with any of these!
Can I make this recipe vegetarian?
Yes! You can swap the chicken for tofu or tempeh. Just make sure to press the tofu to remove excess moisture before cooking it, and it’ll soak up that sweet, garlicky sauce perfectly.
How do I know when the chicken is fully cooked?
The best way to tell if your chicken is cooked is by checking the internal temperature. It should reach 165°F (75°C) when measured with a meat thermometer. You can also cut into the thickest part and ensure it’s no longer pink inside.
Conclusion
There you have it! A delicious, easy-to-make Honey Garlic Chicken that’s sure to wow your taste buds and impress anyone at your dinner table.
Once you try this homemade version, I promise you’ll never look at store-bought sauces the same way again. It’s that good! 😋
Feel free to get creative with this recipe and make it your own. Whether you tweak the sauce, spice it up, or try different proteins,
I’d love to hear how it turns out for you. Don’t forget to share your version with me—let’s make this a tasty community!
You may want to try
Honey Garlic Chicken
Ingredients
Ingredients:
- 2 chicken breasts or thighs, if you prefer
- 1/4 cup honey
- 3 cloves garlic minced
- 1 tablespoon soy sauce or tamari for a gluten-free option
- 1 tablespoon apple cider vinegar or lemon juice as a substitute
- 1 tablespoon olive oil for cooking
- 1 teaspoon ginger optional, for an extra kick
- Salt and pepper to taste
Key Substitutions:
- You can swap chicken for tofu or shrimp if you’re looking for a different protein.
- Honey can be replaced with maple syrup for a lighter vegan option.
- If you don’t have apple cider vinegar feel free to use regular vinegar or even lime juice for that tangy twist!
- These ingredients are simple but pack a lot of flavor and you can easily swap a few things based on what you have at home!
Instructions
How to Cook It: A Step-by-Step Guide
Get that chicken ready: If you’re using chicken breasts, slice them in half so they cook faster. Season them with a little salt and pepper. You can pretend you're a top chef while doing this—just don’t forget to keep it simple!
Heat up that pan: Grab a skillet and heat up the olive oil over medium heat. You want it hot, but not like the surface of the sun.
Cook the chicken: Toss the chicken into the skillet. Let it cook for about 5-7 minutes on each side until it’s golden and cooked through. Don’t rush this part, let it get crispy! When it’s done, take it out and set it aside.
Time for the sauce: In the same skillet, toss in the minced garlic. Stir it around for about 30 seconds—just until it smells amazing (you’ll know it when you smell it).
Mix it up: Now, add the honey, soy sauce, and apple cider vinegar to the skillet. Give it a good stir to mix everything together. Let it simmer for 2-3 minutes so the sauce thickens a bit.
Put the chicken back: Place the cooked chicken back in the pan, and spoon that delicious sauce over it. Let it soak in for another 2-3 minutes. You can even flip the chicken to make sure it gets coated all over.
Serve it up: Plate the chicken and pour the sauce over the top. You’re done! Look at you—cooking like a pro.
Optional: Sprinkle with a little sesame seed or chopped green onions if you want to go all out.
- Enjoy! I know you’re going to love this—your taste buds will thank you later!
Notes
- For an extra crispy texture, sear the chicken in a hot pan before adding the sauce.
- You can swap chicken thighs for breasts or even tofu for a vegetarian option.
")
")
")