")
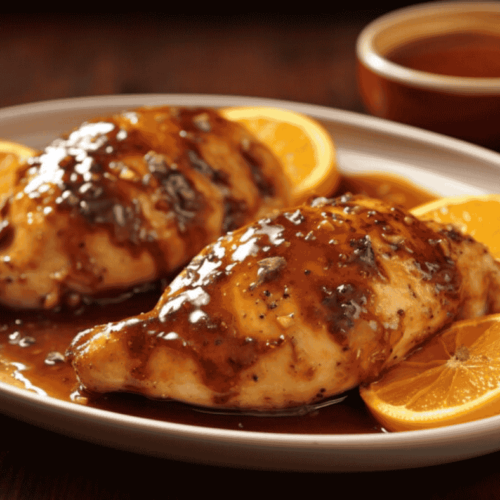
Honey Garlic Chicken Breasts
Hey👋 How are you today? You know those nights when you just want something good—but fast? Yeah, me either.
That’s why I swear by this honey garlic chicken. It’s the perfect mix of sweet, savory, and garlicky goodness, and the best of all? It’s ridiculously easy to make.
I’m talking about a handful of ingredients (you probably already have them), a quick marinade, and just one pan.
That’s it. In just about 25 minutes, you’ll have juicy, flavor-packed chicken that tastes like you put in way more effort than you actually did.
And let’s be real here—nothing beats that sticky, caramelized honey garlic sauce.
It’s the kind of thing that makes you want to lick the plate. No judgment.
So, if you’re tired of boring chicken and want something that feels a little fancy without the extra work, this recipe is for you.
Grab your pan, and let’s make dinner delicious tonight!
Ingredients
For the Chicken:
- 2 boneless, skinless chicken breasts (cut in half for thinner pieces)
- ½ teaspoon salt (adjust to taste)
- ½ teaspoon black pepper
- 2 tablespoons cornstarch (for a light, crispy coating)
- 2 tablespoons olive oil (or butter for extra richness)
For the Honey Garlic Sauce:
- 3 tablespoons honey (adds the perfect sweetness)
- 3 tablespoons soy sauce (use low-sodium if preferred)
- 4 cloves garlic, minced (fresh garlic gives the best flavor)
- 1 tablespoon apple cider vinegar (or rice vinegar for a milder taste)
- ½ teaspoon red pepper flakes (optional, for a little heat)
Substitutions:
- Swap chicken breasts for thighs if you prefer juicier meat.
- Use maple syrup instead of honey for a different sweetness.
- Try gluten-free soy sauce for a gluten-free version.
How to Make Honey Garlic Chicken
1. Prep the Chicken
- Pat the chicken dry with a paper towel. (Nobody likes soggy chicken.)
- Sprinkle with salt and pepper, then coat lightly in cornstarch—this helps create that perfect golden crust.
2. Cook the Chicken
- Heat olive oil in a pan over medium heat.
- Add the chicken and cook for 4-5 minutes per side until golden brown and cooked through. (No pink in the middle!)
- Remove from the pan and set aside.
3. Make the Sauce
- In the same pan, add garlic and cook for 30 seconds (just until fragrant—don’t burn it!).
- Pour in honey, soy sauce, vinegar, and red pepper flakes. Stir and let it bubble for 1-2 minutes until slightly thickened.
4. Coat the Chicken
- Add the chicken back to the pan, flipping to coat in that sticky, garlicky sauce. Let it cook for another minute so the flavors soak in.
5. Serve & Enjoy!
- Spoon extra sauce over the chicken. (Trust me, you’ll want every drop.)
- Serve over rice, veggies, or straight from the pan—no judgment here.
- Dig in and enjoy your new favorite chicken dish! 🎉
Calories & Nutritional Info
Each serving of Honey Garlic Chicken (based on 2 servings) is approximately:
- Calories: ~350
- Protein: 35g
- Carbs: 30g
- Fat: 10g
- Sugar: 20g
Nutritional Notes:
- High in protein – Great for keeping you full and satisfied.
- Lower in fat – Using chicken breasts keeps it lean, but you can swap for thighs if you want a richer texture.
- Sweet but balanced – Honey adds natural sweetness, but the soy sauce and vinegar keep it from being too sugary.
Want to make it even healthier? Use less honey, swap soy sauce for a low-sodium version, and serve it with steamed veggies or cauliflower rice!
Common Mistakes to Avoid
1. Skipping the Cornstarch
That light coating gives the chicken its golden, crispy goodness. Skip it, and you’ll miss out on that perfect texture. Don’t do it. Just don’t.
2. Overcooking the Garlic
Garlic burns fast—like, blink-and-it’s-bitter fast. Cook it for 30 seconds max, just until fragrant. If it turns dark brown, start over (sorry, but burnt garlic ruins everything).
3. Not Letting the Sauce Thicken
The sauce needs a minute or two to bubble and get sticky. If you rush it, it’ll be watery, and nobody wants sad, runny sauce. Patience, my friend.
4. Overcooking the Chicken
Chicken breasts go from juicy to dry in seconds. Cook just until no longer pink inside—use a thermometer if you’re unsure (165°F is the magic number).
5. Forgetting to Spoon Extra Sauce Over the Chicken
Seriously, don’t let that liquid gold sit in the pan. Drizzle it over your chicken, your rice, your veggies—heck, maybe even a spoonful straight into your mouth. I won’t judge.
Variations & Customizations
1. Keto-Friendly Version
- Swap honey for a keto-friendly sweetener like monk fruit or erythritol.
- Use coconut aminos instead of soy sauce to lower carbs.
- Serve with steamed broccoli or cauliflower rice instead of regular rice.
2. Spicy Honey Garlic Chicken
- Add extra red pepper flakes or a drizzle of sriracha for a fiery kick.
- Toss in some diced jalapeños while cooking the sauce.
- Serve with spicy mayo or a squeeze of lime for balance.
3. Vegetarian Swap
- Use firm tofu instead of chicken—press, cube, and pan-fry until crispy.
- Try it with cauliflower steaks or even portobello mushrooms for a hearty twist.
- Follow the same sauce recipe, and you won’t miss the meat!
Serving & Presentation Tips
1. Plate It Right
- Place a bed of fluffy rice (white, brown, or jasmine) on a plate or bowl.
- Arrange the glazed chicken on top—make sure it’s coated in that sticky, golden sauce.
2. Sauce is Everything
- Spoon extra sauce over the chicken and rice. (Don’t leave any behind in the pan—it’s liquid gold.)
- If you want a restaurant-style look, brush a little sauce on the plate for a pro touch.
3. Garnish
- Sprinkle with chopped green onions for freshness.
- Add a few sesame seeds for crunch and a fancy finish.
- Want more color? Thinly sliced red chilies or a wedge of lime add a nice pop!
4. Pair It Up
- Serve with steamed broccoli, roasted veggies, or a crisp side salad.
- Want to go all out? Pair it with a cold drink (like iced tea or a light white wine).
Recipe Best Tips
1. Use Thin Chicken Breasts
Thinner pieces cook faster and more evenly. If your chicken is too thick, slice it in half or pound it flat for better results.
2. Let the Sauce Thicken
Don’t rush it! Let the sauce bubble and reduce for 1-2 minutes so it gets that perfect sticky texture. If it looks too runny, just give it a little more time.
3. Don’t Burn the Garlic
Garlic cooks fast—30 seconds max is all it needs. If it burns, the whole dish will taste bitter. Stir constantly and keep an eye on it!
4. Cornstarch for the Win
Lightly coating the chicken in cornstarch gives it that crispy, golden crust. Don’t skip this step if you want restaurant-quality texture!
5. Adjust Sweetness & Saltiness
Want it sweeter? Add a little more honey. Need it saltier? A splash of extra soy sauce does the trick. This recipe is easy to tweak to your taste!
6. Don’t Forget the Extra Sauce
Spoon every last drop of sauce over the chicken and rice—it’s the best part! 😋
Storage & Freezing
Storing Leftovers
- Let the chicken cool completely before storing.
- Transfer to an airtight container and refrigerate for up to 4 days.
- Reheat in a pan over low heat or in the microwave (30-second intervals) until warm. Add a splash of water if the sauce thickens too much.
Freezing Instructions
- Place cooled chicken in a freezer-safe container or zip-top bag.
- Store for up to 3 months.
- To reheat, thaw overnight in the fridge and warm in a pan or microwave.
Tip: Freeze the sauce separately to keep the chicken from getting soggy!
Frequently Asked Questions (FAQs)
1. Can I use chicken thighs instead of breasts?
Absolutely! Chicken thighs are juicier and just as delicious. Just adjust the cooking time since they may take a little longer to cook through.
2. Can I make this recipe ahead of time?
Yes! Cook the chicken and store it separately from the sauce. When ready to eat, reheat them together in a pan for the best flavor and texture.
3. What can I serve with this dish?
This goes great with rice, quinoa, roasted veggies, or even noodles. A fresh side salad works too!
4. Is there a way to make it less sweet?
Of course! Just reduce the honey by a tablespoon or swap it for maple syrup for a more subtle sweetness.
5. Can I make it spicier?
Yes! Add extra red pepper flakes, a drizzle of sriracha, or even diced chili peppers to kick up the heat.
6. How do I know when the chicken is done?
Use a meat thermometer—when the internal temp hits 165°F (75°C), it’s ready! No thermometer? Slice into the thickest part; if it’s white and no longer pink, you’re good to go.
7. Can I use bottled minced garlic instead of fresh?
You can, but fresh garlic gives the best flavor! If using pre-minced garlic, go for a high-quality brand and adjust the amount to taste.
Conclusion
And there you have it—the easiest, most delicious Honey Garlic Chicken you’ll ever make! Juicy, flavorful, and coated in that irresistible sticky sauce, this dish is guaranteed to become a regular at your table.
Once you try it, you might start side-eyeing those takeout menus. Who needs store-bought when you can whip up something this good in 25 minutes?
If you make this, I’d love to hear how it turned out! Did you add extra spice? Serve it with something fun? Let me know—I’m all about trying new twists.
Now you may want to try
- Teriyaki Chicken Bowl Crock Pot
- Vegan Garlic Butter Baked Chicken Curry
- Shredded Chicken Thighs And Rice
⤵⬇
Honey Garlic Chicken
Ingredients
Ingredients
For the Chicken:
- 2 boneless skinless chicken breasts (cut in half for thinner pieces)
- ½ teaspoon salt adjust to taste
- ½ teaspoon black pepper
- 2 tablespoons cornstarch for a light, crispy coating
- 2 tablespoons olive oil or butter for extra richness
For the Honey Garlic Sauce:
- 3 tablespoons honey adds the perfect sweetness
- 3 tablespoons soy sauce use low-sodium if preferred
- 4 cloves garlic minced (fresh garlic gives the best flavor)
- 1 tablespoon apple cider vinegar or rice vinegar for a milder taste
- ½ teaspoon red pepper flakes optional, for a little heat
Substitutions:
- Swap chicken breasts for thighs if you prefer juicier meat.
- Use maple syrup instead of honey for a different sweetness.
- Try gluten-free soy sauce for a gluten-free version.
Instructions
How to Make Honey Garlic Chicken
Prep the Chicken
- Pat the chicken dry with a paper towel. (Nobody likes soggy chicken.)
- Sprinkle with salt and pepper, then coat lightly in cornstarch—this helps create that perfect golden crust.
Cook the Chicken
- Heat olive oil in a pan over medium heat.
- Add the chicken and cook for 4-5 minutes per side until golden brown and cooked through. (No pink in the middle!)
- Remove from the pan and set aside.
Make the Sauce
- In the same pan, add garlic and cook for 30 seconds (just until fragrant—don’t burn it!).
- Pour in honey, soy sauce, vinegar, and red pepper flakes. Stir and let it bubble for 1-2 minutes until slightly thickened.
Coat the Chicken
- Add the chicken back to the pan, flipping to coat in that sticky, garlicky sauce. Let it cook for another minute so the flavors soak in.
Serve & Enjoy!
- Spoon extra sauce over the chicken. (Trust me, you’ll want every drop.)
- Serve over rice, veggies, or straight from the pan—no judgment here.
- Dig in and enjoy your new favorite chicken dish! 🎉
Notes
- Want crispier chicken? Use a little more cornstarch for an extra crunch.
- Too sweet? Reduce the honey slightly or add a splash more vinegar.
- Make it ahead: Store the chicken and sauce separately and reheat when ready to serve.
")
")
")