")
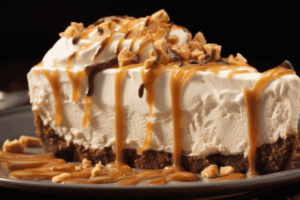
Biscoff Cheesecake Recipe
The Dessert You Never Knew You Needed (But Definitely Do)
Okay, if you’re a fan of Biscoff cookies (and really, who isn’t?), this cheesecake is about to become your new obsession.
And trust me, one bite and you’ll be very amazed how delicious it tastes. So, are you ready to make it? Then let’s get into it!
How to Make Biscoff Cheesecake

Ingredients You’ll Need
- For the crust:
- For the cheesecake filling:
- 600g cream cheese, softened (about 2 1/2 cups)
- 200ml double cream (about 3/4 cup)
- 100g Biscoff spread (about 1/2 cup)
- 150g icing sugar (about 3/4 cup)
- 1 tsp vanilla extract
- A pinch of salt
- For the topping:
- A handful of Biscoff cookies, crushed
- A few tablespoons of Biscoff spread (melted for drizzling)
Step-by-Step Instructions
Step 1: Make the crust
Start by crushing those delicious Biscoff biscuits. You can use a food processor or just throw them in a plastic bag and bash them with a rolling pin.
Once they’re in fine crumbs, mix them with the melted butter until it looks like wet sand.
Press this crumbly goodness into the bottom of a springform pan. Use the back of a spoon to press it down evenly. Put it into the fridge while you work on the filling.
Step 2: Make the cheesecake filling
Grab a big bowl and beat the cream cheese with an electric mixer until it’s nice and smooth.
Add the double cream, Biscoff spread, icing sugar, vanilla, and a pinch of salt.
Beat it all together until it’s thick, fluffy, and dreamy. If it’s not thick enough, let it sit in the fridge for about 30 minutes before you put it onto the crust.
Step 3: Assemble the cheesecake
Take the crust out of the fridge, and put that beautiful, creamy filling on top.
Smooth it out with a spatula, and don’t worry if it’s not perfectly even; it’s still going to be delicious.
Now, it’s time for the fun part: freeze it! Yes, freeze it for at least 4 hours (or overnight for the best cheesecake).
Step 4: Finish it off with a topping
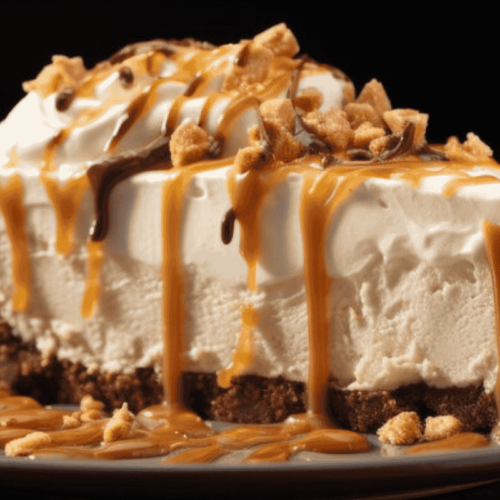
Once the cheesecake is firm, it’s time to add the finishing touches. Put some melted Biscoff spread over the top, be generous.
Then, sprinkle the crushed Biscoff cookies on top. That’s it. Now, just step back and admire your work.
Step 5: Serve and enjoy!
Slice it up and serve. You can even make some extra crumbs to sprinkle on top for that crunch factor. Grab your fork and get ready for the happiest bite of your life.
Common Mistakes to Avoid When Making This Cheesecake
⒈ Skipping the chilling/freezing step
This is a no-go! If you don’t let it chill long enough, your cheesecake will be a bit too soft and not hold its shape. So, the freezer is your best friend here.
⒉ Not pressing the crust down enough
If you don’t press the crust well enough, it might fall apart when you slice into it. Be firm when you press it down.
⒊ Not letting the cream cheese soften
This one’s big! If you try to beat cold cream cheese, you’re going to have lumps. Let it soften to room temperature so it mixes in beautifully.
⒋ Over-mixing the filling
Yes, you want it creamy, but don’t go crazy with it. Mixing too much can result in a runny filling. Once it’s thick, stop.
Recipe Best Tips
⑴ Use a springform pan for easy removal. You can remove the sides of the pan, making serving a breeze.
⑵ Top it with more Biscoff cookies for extra crunch. Seriously, the more, the merrier.
⑶ Add a touch of cinnamon to the filling if you want to give it an extra little twist. It pairs so well with the Biscoff flavor.
⑷ Let the cheesecake come to room temperature for a few minutes before serving for that soft, melt-in-your-mouth texture.
Serving Suggestions
This cheesecake is already a showstopper, but if you want to go all out, you can serve it with a scoop of vanilla ice cream, whipped cream, or even a few extra crumbles of Biscoff cookies on the side.
It’s perfect for a cozy night in or as a dessert for a fancy dinner party. Pair it with a nice cup of coffee to really take it to the next level.
Storage and Freezing

① Storing leftovers: If you have any leftovers (which is unlikely, but let’s pretend), store the cheesecake in an airtight container in the fridge for up to 4-5 days.
② Freezing: This cheesecake freezes well! Just slice it up, wrap each piece tightly in plastic wrap, and store it in a freezer bag for up to 3 months. When you’re ready to enjoy, let it thaw in the fridge overnight, and it’s good to go!

Frequently Asked Questions (FAQs)
Q1: Can I use a different type of cookie for the crust?
A1: Absolutely! If you can’t find Biscoff cookies, try graham crackers, digestives, or even Oreo cookies. Just keep in mind that it won’t have that signature Biscoff flavor.
Q2: Can I make this cheesecake without an electric mixer?
A2: Sure! You can use a whisk or a hand mixer, but be prepared to put in a bit more elbow grease. An electric mixer makes it quicker and easier, though.
Q3: Can I use low-fat cream cheese?
A3: You can, but the texture and flavor might not be as rich and creamy. I recommend using full-fat cream cheese for the best results.
Q4: How do I know when the cheesecake is fully set?
A4: When the cheesecake is set, it will hold its shape but still have a little jiggle in the center. If it’s firm to the touch and doesn’t slide around when you move it, you’re good to go.
Q5: Can I make this in advance?
A5: Yes, in fact, this cheesecake is even better if made a day ahead. It needs time to firm up and get all those flavors to really come together.
Q6: Is there a way to make the cheesecake even more decadent?
A6: If you want to go over the top, top it with chocolate ganache, caramel, or even a few dollops of whipped cream. No one’s going to complain!
Q7: Can I make this without the Biscoff spread?
A7: If you can’t get your hands on Biscoff spread, you can use any other cookie butter spread, or even a peanut butter-based spread for a different twist. Just know, it won’t taste exactly the same, but still be delicious.

Conclusion
Alright, I think we can agree this Biscoff cheesecake is an absolute game-changer.
Whether you’re making it for a special occasion or just because you’ve been craving something sweet (we’ve all been there), it’s going to be a hit.
Now go ahead, take a bite, and let me know how it turned out.
You Might Also Want To Try
⤵⬇⬇⬇
Biscoff Cheesecake Recipe
Ingredients
Ingredients:
Crust:
- 200 g Biscoff biscuits
- 100 g unsalted butter melted
Cheesecake filling:
- 600 g cream cheese softened
- 200 ml double cream
- 100 g Biscoff spread
- 150 g icing sugar
- 1 tsp vanilla extract
- Pinch of salt
Topping:
- Crushed Biscoff cookies
- Melted Biscoff spread
Instructions
Step-by-Step Instructions:
Step 1: Make the crust
- Start by crushing those delicious Biscoff biscuits. You can use a food processor or just throw them in a plastic bag and bash them with a rolling pin.
- Once they’re in fine crumbs, mix them with the melted butter until it looks like wet sand.
- Press this crumbly goodness into the bottom of a springform pan. Use the back of a spoon to press it down evenly. Put it into the fridge while you work on the filling.
Step 2: Make the cheesecake filling
- Grab a big bowl and beat the cream cheese with an electric mixer until it’s nice and smooth.
- Add the double cream, Biscoff spread, icing sugar, vanilla, and a pinch of salt.
- Beat it all together until it's thick, fluffy, and dreamy. If it’s not thick enough, let it sit in the fridge for about 30 minutes before you put it onto the crust.
Step 3: Assemble the cheesecake
- Take the crust out of the fridge, and put that beautiful, creamy filling on top.
- Smooth it out with a spatula, and don’t worry if it’s not perfectly even, it’s still going to be delicious.
- Now, it’s time for the fun part: freeze it! Yes, freeze it for at least 4 hours (or overnight for the best cheesecake).
Step 4: Finish it off with a topping
- Once the cheesecake is firm, now it’s time to add the finishing touches. Put some melted Biscoff spread over the top, be generous.
- Then, sprinkle the crushed Biscoff cookies on top. That’s it. Now, just step back and admire your work.
Step 5: Serve and enjoy!
- Slice it up and serve. You can even make some extra crumbs to sprinkle on top for that crunch factor. Grab your fork and get ready for the happiest bite of your life.
Notes
- Make sure your cream cheese is softened before mixing for a smooth texture.
- Freeze for at least 4 hours to let the cheesecake firm up perfectly.
- Top with extra cookies and melted Biscoff spread for the ultimate indulgence.
")
")
")